Blogs
A Brief History of Making Copper Objects. Part 2: Casting Techniques
* This text is based on an essay originally written for the MSc in Conservation, UCL *
By Mariana Pinto
The ARTECHNE project investigates technique in the arts. Such techniques can leave traces in objects that may help us to understand the manufacturing process of an artefact. In the previous entry, a short introduction to the extraction of copper was provided. Also, the five steps for the smelting process of this metal were explained: 1) the mining of the ores; 2) their preparation and cleaning; 3) the smelting, to create an ingot; 4) the refining and casting of the metal and 5) the hot or cold working of the metal. The fifth and last step –hot and cold techniques used for working the metal- deserves more detailed attention. Casting and hammering were two main methods used in the production of ancient copper artefacts and these techniques can be recognized by traces left in the final objects. Although there are sometimes no clear indicators that tell us about the true nature of a used technique, a combination of traces may provide an orientation on the manufacturing process. In this entry, one of these techniques and how to recognise it in manufactured ancient objects will be discussed: casting.
The main tool required for ancient bronze casting was a mould. Four types of moulds were used in antiquity: open moulds and piece-moulds (image 1), false core and lost wax[1] (image 2). The open mould is the simplest one, as it is only a depression made in the material in order to receive the liquid metal (image 1). It was usually made of a type of stone that would be able to take the high temperatures of the metal, such as soapstone, sandstone or specific types of clay. As a result, only very simple open shapes can be made; otherwise it would not be possible to remove the metal from inside of the mould once it was solid. So, how to recognise this technique in an object? The fact that it has a simple shape and is fairly small may be an indication.
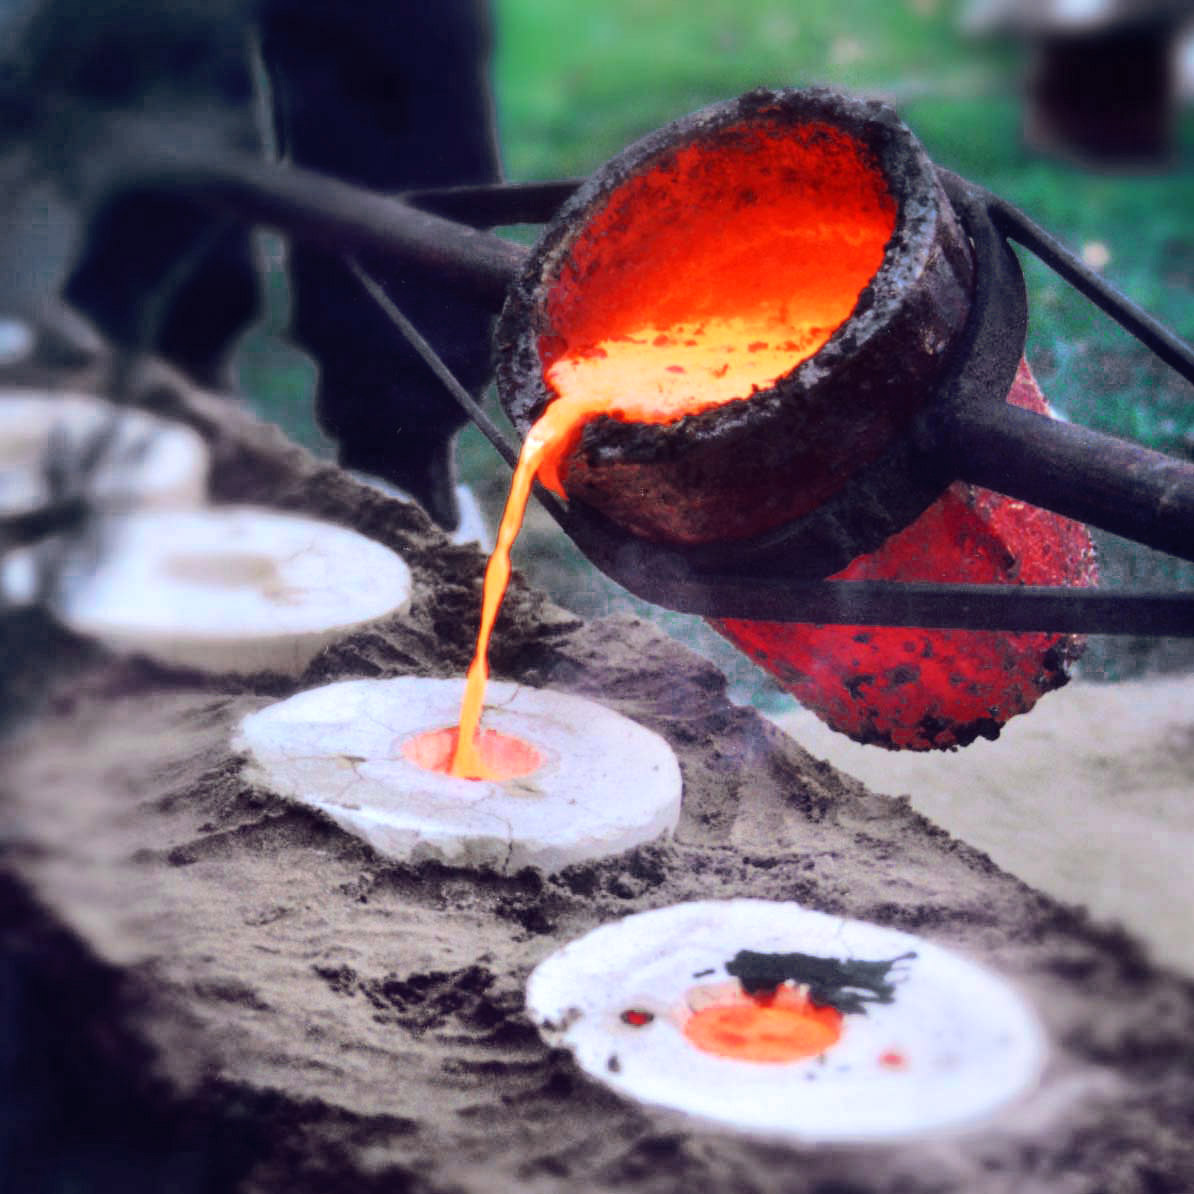
Liquid bronze at 1200°C is poured into the dried and empty casting mold (Photo by Istvan Takacs, image from Wikimedia Commons). File URL: https://commons.wikimedia.org/wiki/File:Born_bronze_-_Bronze_casts.jpg
Piece-moulds are similar to open moulds (image 1), but the final object is made of two or more pieces. They were sometimes also made of stone or clay; but in other cases, they were made of bronze. This alloy was more durable and therefore more useful when repetition work had to be carried out, such as for common tools and weapons. The objects made with this technique can sometimes be recognized because they have narrow ridges of metal between the mould pieces. Although these joint-lines were sometimes completely removed afterwards, if this was not done, they are a reliable indicator that the object was cast in a piece-mould.
In some cases, a false core made of clay was used with piece-moulds. The clay was built to fit in the space were the metal would be poured, and then reduced as much as the thickness of the object would be. If complex shapes were built, it was sometimes necessary to make channels to allow the air and gases to escape (these parts were cut away after the metal was cold). Such cores were sometimes used in order to reduce the weight of the object or the quantity of the metal[2].
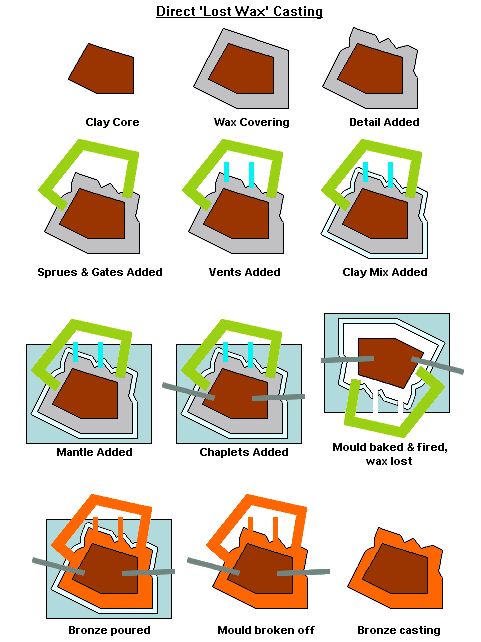
Bronze Casting by the Lost Wax Method (Original image by Jonkerr, redone by H. Padleckas, image from Wikimedia Commons). File URL: https://commons.wikimedia.org/wiki/File:Bronze_casting_by_the_Lost_Wax_Method.png
Finally, the lost wax method was also used, although this implies more steps (see image 2 for a detailed illustration of this process, videos are also available online, such as this one). A core of clay was built and then covered by wax, which was modelled with the thickness and shape of the final object. On top of the wax, a layer of clay was added, forming a single piece mould. At this stage, runners, risers or vents were added so the air could escape once the metal was poured. Wires (called chaplets) were used in order to maintain the core in its place. These were usually made of the same metal as the cast object, so when the metal was cast, they would become part of the final artefact and the protruding ends were removed. Next, the whole piece is heated so the wax melts and runs out of the mould and the molten metal can be poured into the space left by the wax. With this method the mould has to be broken after every use. Since the core was sometimes left inside of the object, this is a strong indicator of the technique used. However, the core is not always found because with high quality work, a space was placed in order to take out the material from the inside once the object was cast.
Another frequent technique used to work ancient copper was hammering. This will be discussed in the following blog entry, the third and last part from the copper series. This exploration of casting techniques shows that traces of techniques in the finished artefact can help us to uncover and understand the creation process, and match it to historical textual sources documenting such techniques.
[1] Hodges, Henry. 1989. Artifacts. An introduction to early materials and technology. London: Duckworth, pp. 70-73. Lang, Janet. 2005. “Metals” in Radiography of cultural material, edited by Janet Lang and Andrew Middleton, 49-75. Oxford: Butterworth-Heinemann, pp. 51-52.
[2] Lang, Janet. 2005. Op.cit., page 56.